Simply edging the grass can really make a visual impact in your yard’s appearance. However, adding a plant or light edging to your pathway can take your curb appeal to the next level!
A few plants to consider for your path edges:
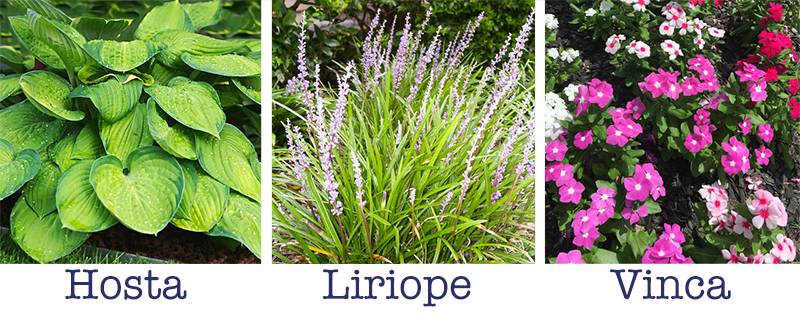
Hostas: This shade loving plant produces wide plush leaves, available in variegated colors. This plant’s consistent growth makes maintenance simple. Established plants also produce flower stalks.
Liriope: This is a low maintenance, fairly drought tolerant option to beautify your walkways. This grass like plant comes in a few varieties of colors and grow tiny flower stalks too.
Vinca: This pretty flower-based bush is a very hearty plant that reseeds – which means it continuously fills dedicated areas with vibrant flowers. These relatively low maintenance flowers are available in a variety of colors too!
Lighting: Path lights are an easy way to upgrade your walkways. These days solar and dusk-to-dawn options make installation and maintenance even more simple. We found the options below on Amazon.
Okay, I chose my plant or light, now how do I arrange them?
Plants: Plan for what size the plant will be, not what it is when you buy it. Check the information label on your plant, if the plant will grow to be at least 3 feet wide and 3 feet tall, we’d want to plant them at least 4 feet apart.
Plants AND Lights: Place the lights evenly between each plant so it looks like a planned design.
Lights Only: Use a yard stick or measuring tape to evenly space the lights.
PLANT TIPS:
A yard stick is a great tool for spacing.
Lay out the plants in their containers to visualize the spacing before digging holes. (Use sticks or paint stirrers to do the same thing for spacing lights.)
Be sure to choose plants that are right for the amount of sun or shade in your selected area.
Water regularly, this is especially important when newly planted.
Before you buy, be sure to research and/or check with a plant specialist at the nursery for information on the plants you like. A good nursery will usually have specific plant information, care tips, and will give you suggestions for planting them to flourish.
Well technically “chrysanthemums” is the word – and they are the perfect little flower for fall landscaping.
Mums the Word!
Mums are one of the easiest ways to give your autumn curb a happy little kick of color. These flowers are easy to care for, a reasonable cost, and available in the garden department of almost every home improvement store. What are you waiting for? Grab a few planters today and give your yard all of the fall vibes it deserves!
More About Mums:
Mum flowers typically last about one month, in our warm Florida climate they can last longer if you cut off flowers as they fade. Cut the flowers just below their base, leaving the stem long.
Mums are thirsty flowers, so water them a few times a week to keep them happy and blooming as long as possible. A wilted mum is a sad mum indeed. Water at the base of the plant, rather than on the leaves or flowers.
These flowers love being in the sun, which can also dry them out, so give them their time in the sun, but don’t forget to water.
Keep away from pets. Mums are best to use in areas that your pets do not have access to, as I read mums can make pets sick if eaten.
If you plant your chrysanthemums in the ground, cut the stems back to about 4″ after the plant has gone brown and dormant to encourage new growth next season.
Mums come in a variety of colors – reds, yellows, even purples.
A really cute way to decorate with mums is by creating, what we call, an autumn “porchscape.”
You will need:
1 hay bale
3 to 5 pumpkins in varying sizes (Psst, you could even throw in a seasonal gourd if you’re feeling extra… fall-y?)
1 bandana or fabric square in a complementing fall color or pattern
1 to 3 potted chrysanthemums
1 small chalkboard easel or fall sign
Let’s make it:
The first thing you will have to decide is where you want your porchscape – on a table, or on the ground? For a table you could use smaller hay bales available at craft stores with mini pumpkins, while ground-based creations would require bigger hay bales and larger pumpkins. Whatever the size, the design approach is the same:
When in doubt, odd numbers usually work best for groupings or quantities
Designs like this tend to look better slightly off center, and at angles rather than perfectly centered or flush against walls
You want some elements that are taller (the mums), some medium (the hay bale) and some smaller (the pumpkins)
Your show piece pumpkin selections should be half as tall as the hay bale or mums and shorter so you can make little tiered groups
How we would do it:
Start with your hay bale, at an angle, out from the wall. Make sure that your design is in a good, safe, and dry place. Never put decorations near heat sources like lights, outlets, or in the path of high traffic or sprinklers.
Drape your bandana or fabric square over the bale off center, to the right. Drop a corner over the front edge as a color/shape accent. You’ve just created a little stage to set items on!
Next place one mum on the floor on the right side of the hay seated back, one mum on floor in front of the hay left of center, and one mum on the top of hay on the left corner. This should create a visual triangle with the mums.
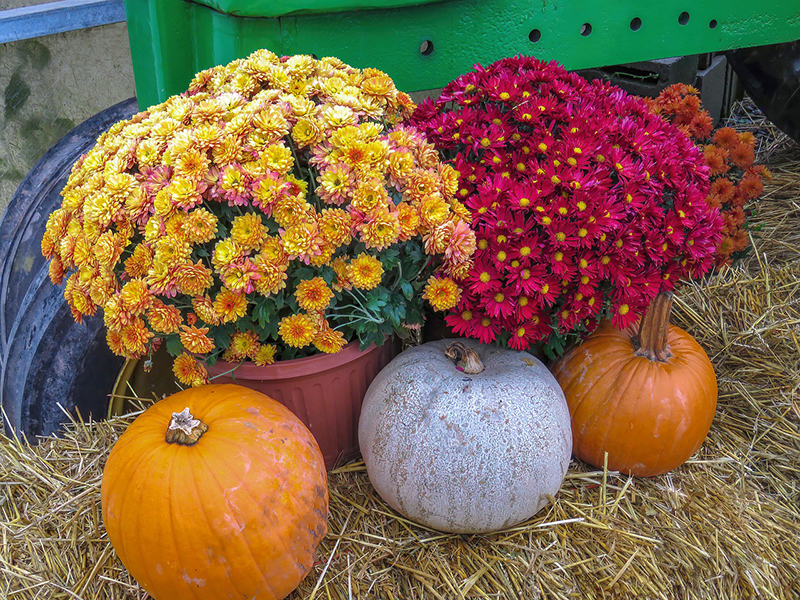
Then you fill in your design around that triangle – large pumpkin on ground in front of the mums on the right side of hay, place another large pumpkin next to planter on top of hay, group with one to two smaller pumpkins.
Finish with a friendly message or fall sign on your small chalkboard easel placed on the fabric on the top of hay bale. You can cozy up a mini pumpkin around your sign for even more autumn-ness if you like.
Kinda like this:
Think of this as an outline for your porchscape. You may need to move things around to work out the right feel for your space with the exact flowers and elements you’ve selected. Get creative – you may prefer to create this concept backwards, or to group two mums together, or use more pumpkins… that’s all the fun of design, go for it! Pro tip: view your porchscape up close and from a distance as you rearrange items. Move one thing and stand back to see how it looks as a whole design. You may find you need to angle or move things further than you think, and you can see that best by standing back a little to take in the whole composition.
The most important part is to have fun creating and don’t forget to share your porchscape masterpiece with us on Facebook or Instagram!
Don’t have a porch to “scape”? We can help with that! Getting pre-approved for a home loan is all done virtually! Click on “Apply Now” to learn more or call us!