
This month we are sharing our finds to help organize the kitchen pantry. From cans, to dry goods, pastas to cereals… even your avalanches of spice jars – we’ve hopped over to Amazon and found a little something to arrange it all.
MEET THE ORGANIZERS:
CLEAR BINS
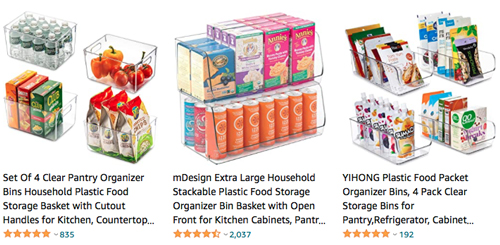
Clear bins allow us to see things at a glance. Containers with higher walls also seem more versatile than the shorter walls, but you will have to assess your particular needs. Clear bins are great for: bags or small boxes of sides, snacks, packs of things like oatmeal, granola bars, individual chip bags, bagged soups, beverages in boxes or packs, etc.
AIR-TIGHT CONTAINERS

Air tight containers are great for: pastas, cereals, dry beans, rice, candies, flours, sugars, etc.
RACKS
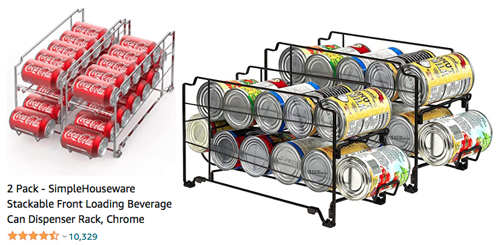
Storing things like soda and soup cans are so much more efficient on racks. We like the racks like the picture above; single row units where the cans slide forward as you use them, so that you can easily cycle through the cans. Make it easy to find what you’re looking for by dedicating one rack (or row) to one type of can: canned soups – OR – canned vegetables OR canned fruits OR canned beverages, etc. Canned goods are heavy, be sure to distribute the weight of these items by placing them at the strongest points on your shelves. We do not recommend stacking units or having all the cans on one shelf. (See arranging ideas below) Can racks are great for: REGULAR sized canned vegetables, soups, fruits, and beverages.
SPICE RISERS
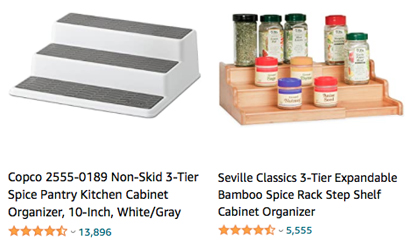
Spices can overwhelm a cabinet, but these little risers really help to keep things nice and neat. Keep your most used spices on the bottom step of the riser, with the least used spices stored on the top. Spice risers are great for: standard and short spice bottles.
BASKETS
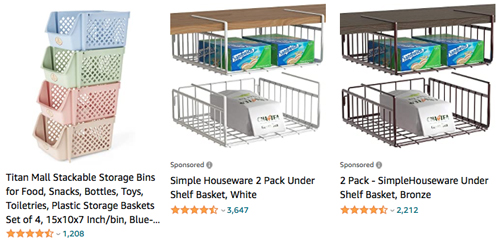
For the other odds and ends. Baskets are great for: potatoes, onions, dedicated snack bins for individuals (add a cute name tag), food storage items like bags and foils, etc.
Where to start?
REMOVE IT ALL! Sounds daunting, but it was actually kind of fun and refreshing once you get going. Fully wipe down the shelves. Sort out the expired goods. Play some good music to keep your momentum.
TOSS:
Expired items? Toss them. If it’s had time to expire, you don’t use it anyway.
BUNCH of cereals? Do a taste test, they’re likely stale. Time to toss!
COMBINE:
Several opened bags or boxes of the same items? Combine them. Think: flours, pastas, sugars, dry beans, rice, snacks, spices, etc.
Note: Don’t make multi-ingredient confetti. Only combine like things. Example; several open boxes of spaghetti noodles? Combine them. But DON’T combine, say an open bag of bowtie pasta with penne pasta, and spaghetti noodles just to save space. If you don’t cook it or eat it together, don’t combine it together.
Now the fun part:
MAKE YOUR OWN LITTLE STORE!
Arrange goods like your own little store! Keep the things you use most often at eye level. Things you use least often on the harder to reach shelves.
Canned goods: organize them by type. Soups, Vegetables, Fruits, Meats, Drinks.
Arranging the goods: consider organizing every shelf by a theme. Since we all don’t have giant pantry rooms at our disposal (like the celebrities on these organizing shows do), we have created this simple 4-shelf outline to start your realistic pretty pantry endeavors. Swap the shelve order for how (or who) uses the items on it most often. The most accessed items/shelves should be easiest to reach.

CEREALS and BREAKFAST – top shelf:
Start with the sweet cereals on one end, move to the healthier options in the middle, then things like oatmeals, granola bars and breakfast alternatives, then nut butters, jam, and syrups on the other end.
SNACKS and SWEETS – mid shelf:
Start with canned fruit (can rack), then boxed cookies, move to boxed crackers, chip bags, dips, then dried fruits and nuts. This is also a good shelf for canned beverages (can rack).
PASTA and BEANS – mid shelf:
Start with your canned vegetables (can rack), then canned meats (think tuna, chicken, etc.), sides in packages or boxes, pastas, then dry beans/rice, jar goods (olives,pickles, etc.), condiments
BAKING and BLUE MOON – bottom shelf:
Start with sugars and flours, then oils and other baking essentials/decorations (spice riser/ clear bins). Next, boxed mixes, your rarely-used “in a blue moon” goods, then spices (spice riser), and end with canned soups (can rack).
Are you proud of your pretty pantry? Share your tips and pics with us on Instagram! Use the hashtag: #DandCOPrettyPantry
